In recent years more attention is being paid to the steel surface cleanliness and profile requirements for protective coatings.
Driven by a need for increased coating life and also changing coating technology with solvent-less Ultra High Build Epoxies, surface profile is a regular topic of conversation with contractors and inspectors.
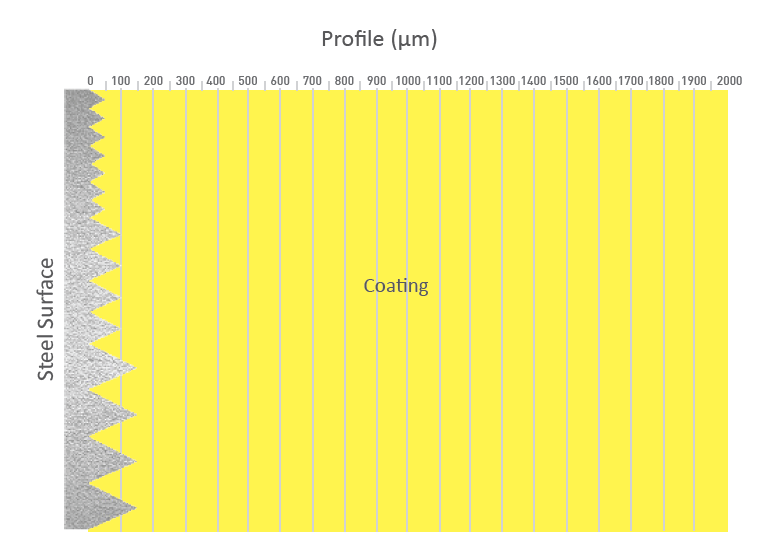
There are many inconsistencies in the industry with profile requirements for coatings. The traditional thought was “the thicker the coating the more profile is required.” On the other hand, the rule of thumb was to have no more than one-third surface profile height to the total coating thickness.
Coating data sheets and customer specifications often conflict. There seems to be little understanding of what is the best practice.
In an attempt to understand the effect of surface profile height on the adhesion of Ultra High Build Epoxy coatings, BlastOne conducted testing on panels with one coating on steel substrates with different profile heights at different total coating thicknesses.
By looking at the finding of the test and comparing with the traditions in the industry, it is easy to see where a lot of the misunderstandings occur with protective coatings contractors. A coatings contractor has
much on his mind on a project site. We have seen the rise of third party and NACE qualified inspectors. Surface profile and surface cleanliness are important and yet are still confused.
It is so important, the old saying goes that “a coating is only as good as the surface preparation.” With that in mind it is time to pay attention to the surface preparation as a whole.
There is still more work to be done but we have some evidence to clarify the effect of high or low surface profile. Additionally, we want to dispel the myth that a higher surface profile is necessary to increase coating adhesion. This study is a start to increase our understanding and reduce confusion on best practice for surface profile.
INTRODUCTION
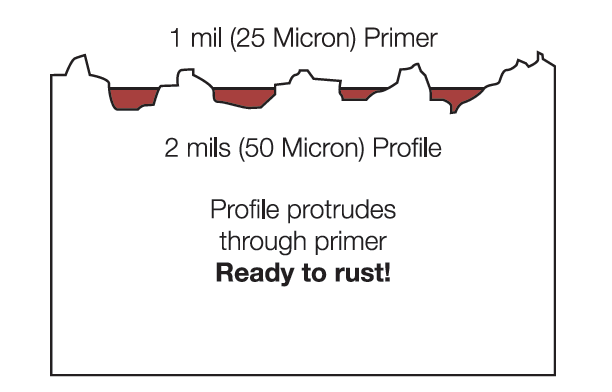
Surface profile takes on several names including anchor pattern, surface roughness, surface profile and then there are the classifications of surface roughness including Rx, R-max, R-a, R-t. For the technically minded, the coatings industry has typically measured R-t which is the total height from the lowest valley to the highest peak in a given area.
This itself has some limitations because it is affected by rogue peaks but is a generally accepted method of measuring the surface profile in the coatings industry.
What should surface profile be?
Many coating product data sheets call for surface profiles of 75-100μm. Others call for 38-50μm surface profile for a very similar coating type – why should this be?Why do we measure surface profile on steel surfaces?
- It increases the surface area to provide a better bond between the coating and steel substrate. We have always thought that the increase in surface area was about one-third. More recent studies have shown incidentally that it is more likely to be 16-18% but this is still being verified by independent testing.
- Secondly, the assumption is that in increasing the surface profile some cleaning will take place which will remove contaminants that would impede the adhesion between the coating and the substrate.
One instance the author experienced early in his career was when an unmanned offshore gas platform was being built for BHP. The specification called for a 75-100 micron profile based on the fact that there was to be a 3,000 micron ultra high build epoxy coating to be applied to the splash zone.
Their client’s representative said “if the range in the specification is 75-100 microns I want closer to 100 microns” in other words more is better. Of course the customer said ‘yes sir!’. Incidentally the inspector had his own measuring challenges and insisted the profile was only 33 microns. I witnessed the witnessed the customer spending tens of thousands of dollars unnecessarily to achieve a profile that appeared to be unnecessary to achieve the right surface for the coating to be applied.
Another reason with surface profile is the confusion of units. For example, some coatings suppliers in Australia ask for a profile of 88 microns. Eighty-eight microns is an unusual number to just appear from nowhere – well it’s not unusual and it doesn’t just appear from nowhere, it’s simply the conversion from mils or thous (thousands of an inch) to microns.
3½ mils is 88 microns!
Which brings us to another point.
IMPERIAL VS METRIC
Many of the specifications and data sheet we use today are converted from the United States who use imperial units like mils/thous (1/1000 of an inch = 25.4 microns).
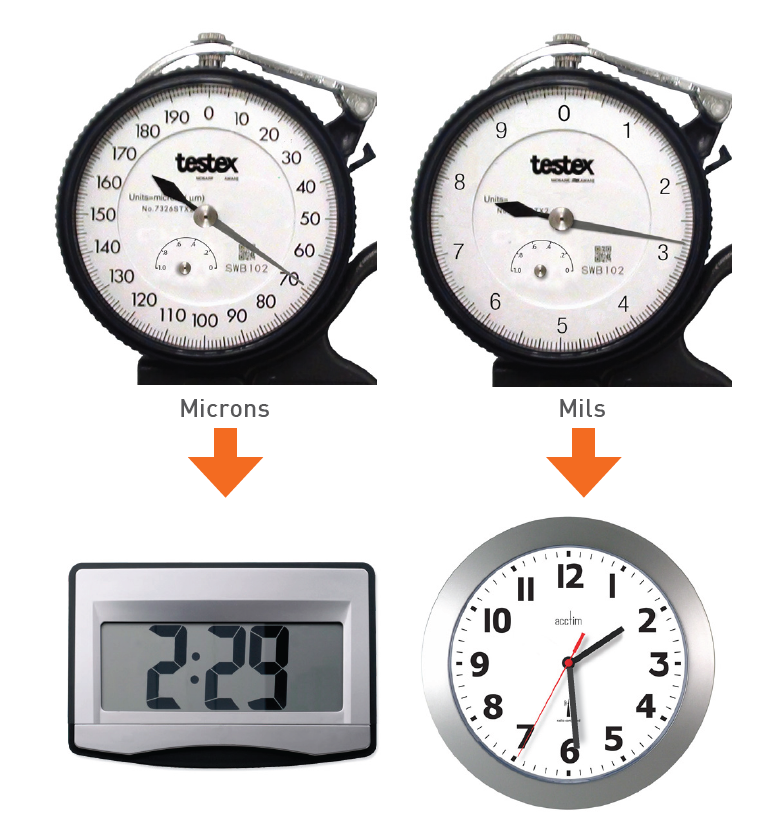
When we measure profile and the specification has been converted from an Imperial standard for the profile reading (for example 2 ½ mils), to the equivalent metric standard (ie 63 microns) it’s a little bit like comparing analogue time with digital time. One day we say “I’ll see you at half past 2” and in reality if the meeting started at 2:26 or 2:34 no-one would really mind. But if it’s digital you say it’s starting at 2:30 and 2:29 is early and 2:31 is late.
Applying that to profile, one of the most common methods for measuring surface profile, is Testex replica tape. If the specification calls for 3 mils and the actual reading is 2¾ mils, it is only 1 increment away on the gauge face and the inspector may say “it’s close enough I’ll pass it.”
If you have the same reading in microns, and the specification says it must be 75 microns (3 mils is about 75 microns), if a reading of only 69 microns is achieved (the equivalent to 2 ¾ mils), well that reading hasn’t even got a 7 on the front and the inspector may be likely to say “no, it’s a fail and it needs to be re-blasted to get a higher profile.”
These challenges that confront the industry are merely pointed out as areas that leave clients, contractors and inspectors in a position where they feel they need to make their own interpretation. They are making on the spot decisions that may appear right at the time with all good intent, but have the hidden effect of costing someone, often the contractor, a lot of money, unnecessarily.
OTHER RESEARCH
I would like to refer to instances five instances of research in this field. Although the research projects referenced were not conducted specifically for this exact issue, they contain results that are of interest and relevance around the question of whether higher surface profile increases coating adhesion.
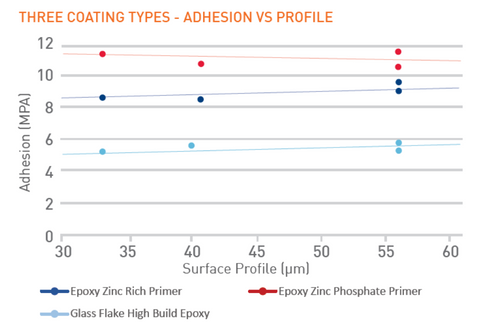
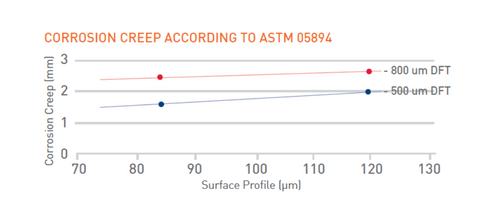
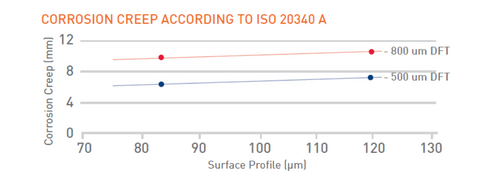
- In 2006 CTI Consultants undertook some testing around blasting with different grades of garnet. Four different grades were used. Some of the results of the research are shown below and there is no clear indication of any difference in coating adhesion across three different types of coatings, whether they are applied on a 30 micron profile through to a 60 micron profile.
- In 1983 Corrosion Control Consultants and Labs working with the Michigan Department of Transport concluded there have been more coating failures due to excessive profile than low profile. Bearing in mind, that is in contrast to no profile. It assumed the steel had been blasted to create some profile but the profile was low.
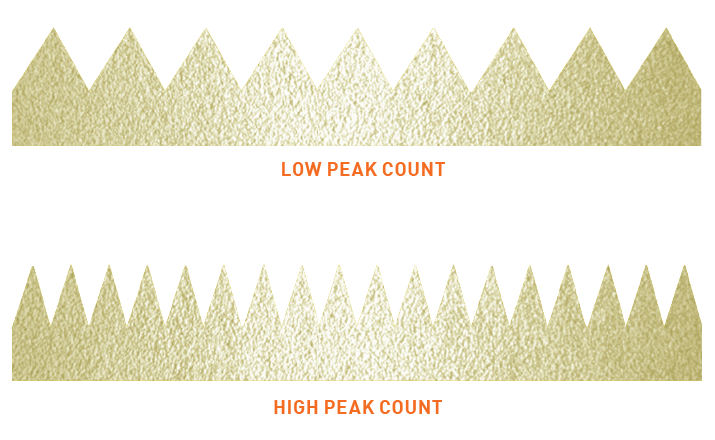
- In 2005 authors Roper, Werner and Brandon investigated the effect of the peak and valley count in the profile, commonly called the Peak Count, which is simply a measurement of the number of peaks and valleys in the profile. The results of their investigation is very interesting. There are two outcomes from their research:
- One is that across different profile heights there was no effect on adhesion.
- Secondly, the peak count, that is the number of peaks and valleys in the profile does have an effect on adhesion. The interesting thing about that is it is generally assumed that to increase your peak count you actually have a smaller profile because you’re using a smaller abrasive.
- In addition, they say a consistent profile height will provide better coating performance.
- Higher peak count generally means low surface profile reading.
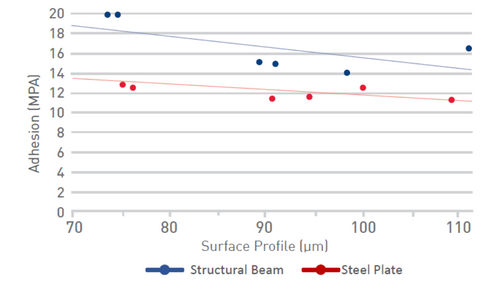
- In 2011 Extrin Consultants were looking at the adhesion of coatings over surfaces blasted with six different abrasives. It is quite an extensive paper with a large database of results. In those results there is no correlation of a greater coating adhesion being achieved on a surface with greater surface profile.
- In 2008 Darren Ward from International Paints in the UK was investigating profile shape, that is the profile produced by angular grits versus rounded steel shots and concludes that there is no significant differences in performance when comparing different grades of shot or grit.
BLASTONE RESEARCH
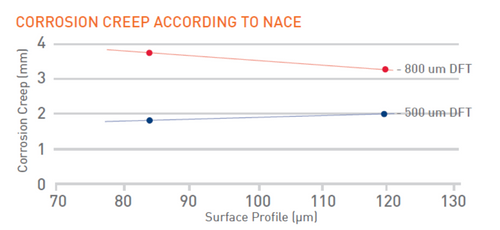
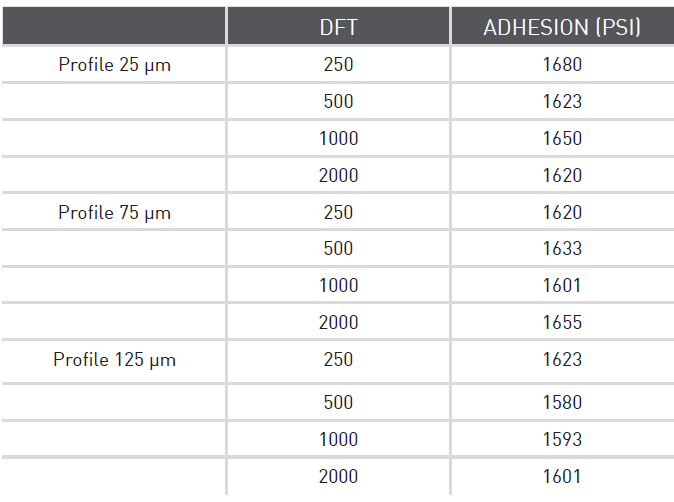
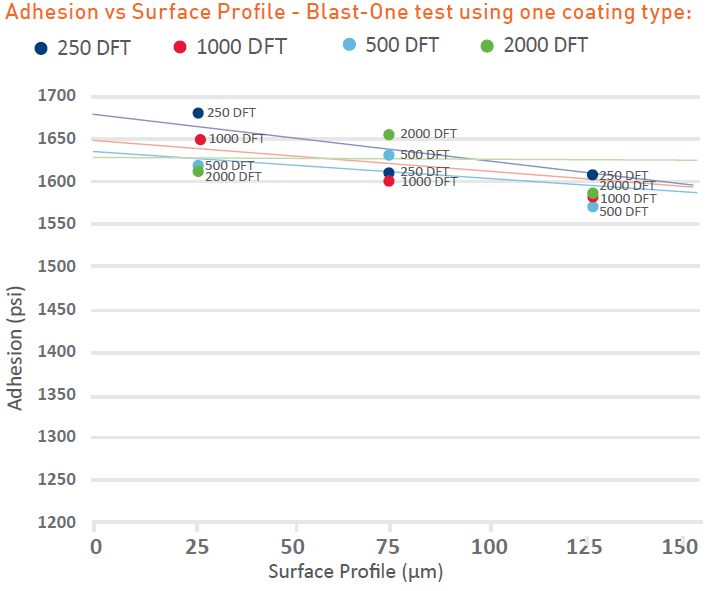
To try and get an answer to the question whether profile height affects adhesion we decided to use a single abrasive type to a universally accepted cleanliness of blast. The same coating with three different profile heights and three different coating thicknesses, all with a solvent less epoxy coating. We used Testex tape to measure the surface profile. The results shown in the table with surface profiles of 25 microns, 75 microns and 125 microns surface profiles across and utilizing coating thicknesses of Dry Film Thickness of 250 microns, 500 microns and 1,000 microns.
RESULTS
It is very interesting to note that a 1,000 micron coating on a 25 micron surface profile had very similar adhesion results to a 250 micron coating on a 125 micron surface profile. This leads us to conclude that there is no noticeable correlation and verifies that there is no statistical relationship, between profile height and coating adhesion.
The results also showed the limitations of utilizing Testex tape over a wide range of profile heights requiring the use of different Testex tape ranges and the variation between the different grades of Testex tape.
To calibrate the gauge for a 250 micron coating, 300 micron shims were used to do a rough surface calibration to try and get an accurate coating thickness reading which was the full thickness of the coating above the tops of the peaks of the surface profile.
CONCLUSION
In conclusion, assuming the results of the test provide a consist profile shape, cleanliness and peak count there appears to be no statistical reason to insist on higher surface profiles for higher film build coatings, say, above 400 microns, which is the lower end of the DFT range for solventless/UHB coatings used today This may be counter-intuitive to the traditional thinking in the industry, however, this does correlate with other research done in the field.
DISCUSSION
There are other factors that will affect coating adhesion which we know.
These included cleanliness or class of blast, the peak count, the profile shape, and whether there is a profile.
There is also much debate around how profile is measured: Testex tape versus stylus gauges, the particular standard to which the stylus readings are used for, whether to use R-t (total peak to valley profile height) and the variation in profile readings from different ranges of Testex tape, which is still a very widely used profile measuring method.
There is also a question about what is a suitable minimum profile. Further research needs to be done in this area. The range of profiles discussed in this paper are from 30 microns to 125 microns, or 1 mil through to about 5 mils, which is the level of surface profile generally seen if the steel surface is cleaned by traditional abrasive blast cleaning or shot blast Wheelabrator type cleaning machines.
We do not have data to suggest a lower profile than 25 microns or greater profile than 125 microns will affect coating adhesion.
SUMMARY
With the research that has been discussed, and the more recent tests completed showing correlated results, one would be comfortable assuming that the steel is clean and there is more than a 30 micron profile, the chances of a well established coating performing well on adhesion test is very high.
SURFACE PROFILE
IS YOUR SURFACE PROFILE COSTING YOU PAINT?
CASE STUDIES
Contact BlastOne
We love to talk to customers and help them make the best decisions when purchasing equipment.
You can reach us via our Live Chat, Email, Phone, and Online Form.
 My Account

